Welcome to the PWP Corner’s section on Exposure and Habituation for a Specific Phobia.

The PWP Corner is designed for therapists. If you are not a therapist try looking at my self help section instead.
This section has two parts:
1) Self help worksheets.
2) Information on how to guide a patient through exposure and habituation.
Exposure and Habituation Worksheets:
These are free to use worksheets you can use with your patients.
Click the image to download the worksheet.
ABC Cycle:

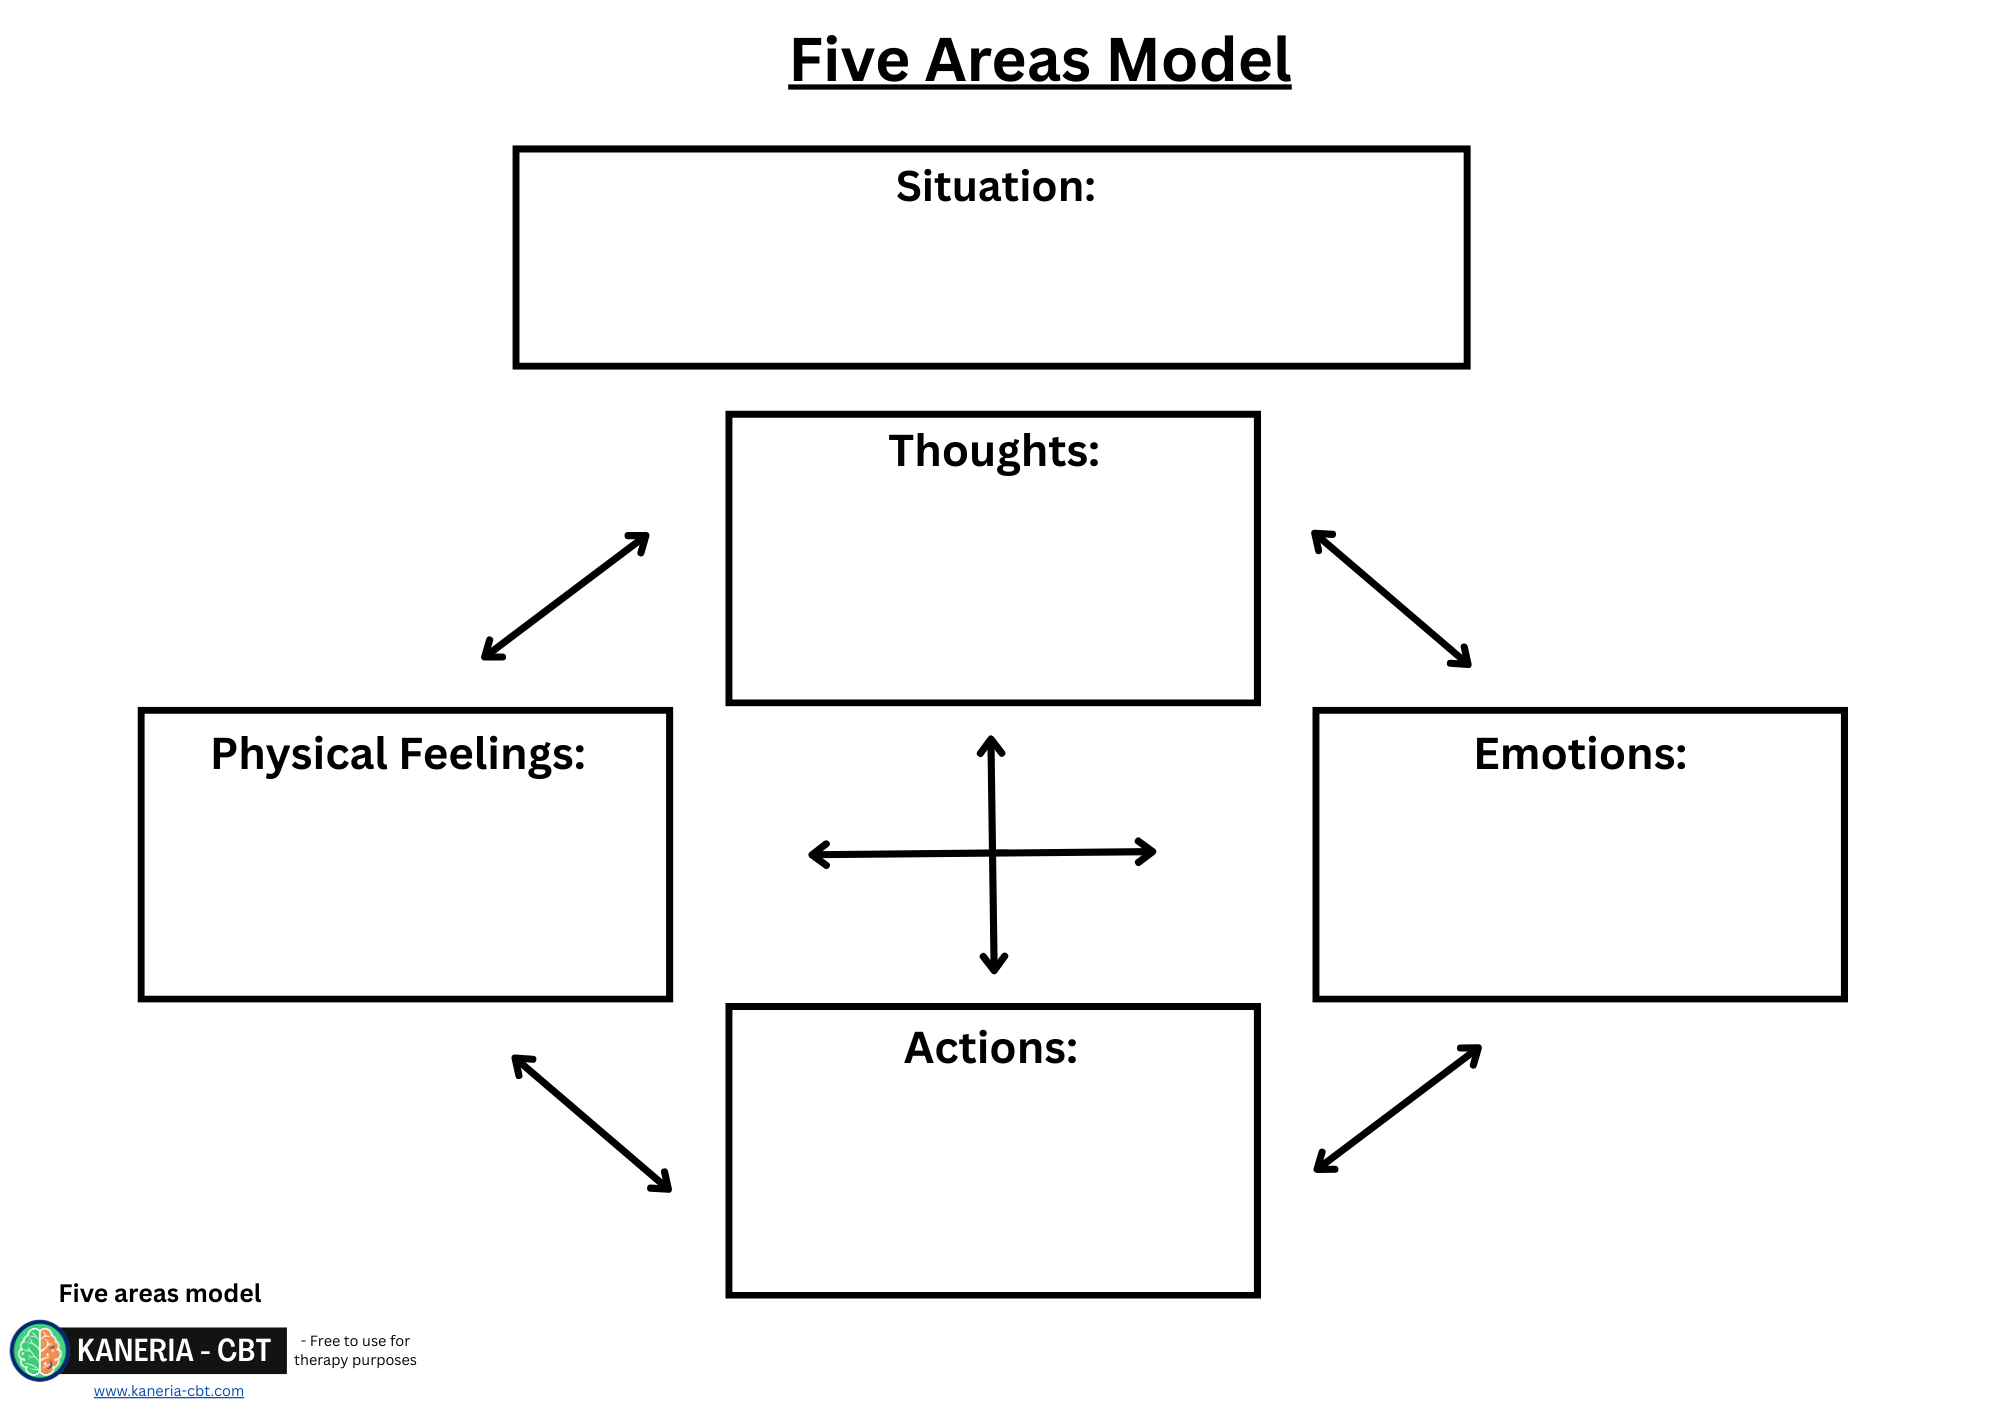
Five Areas:
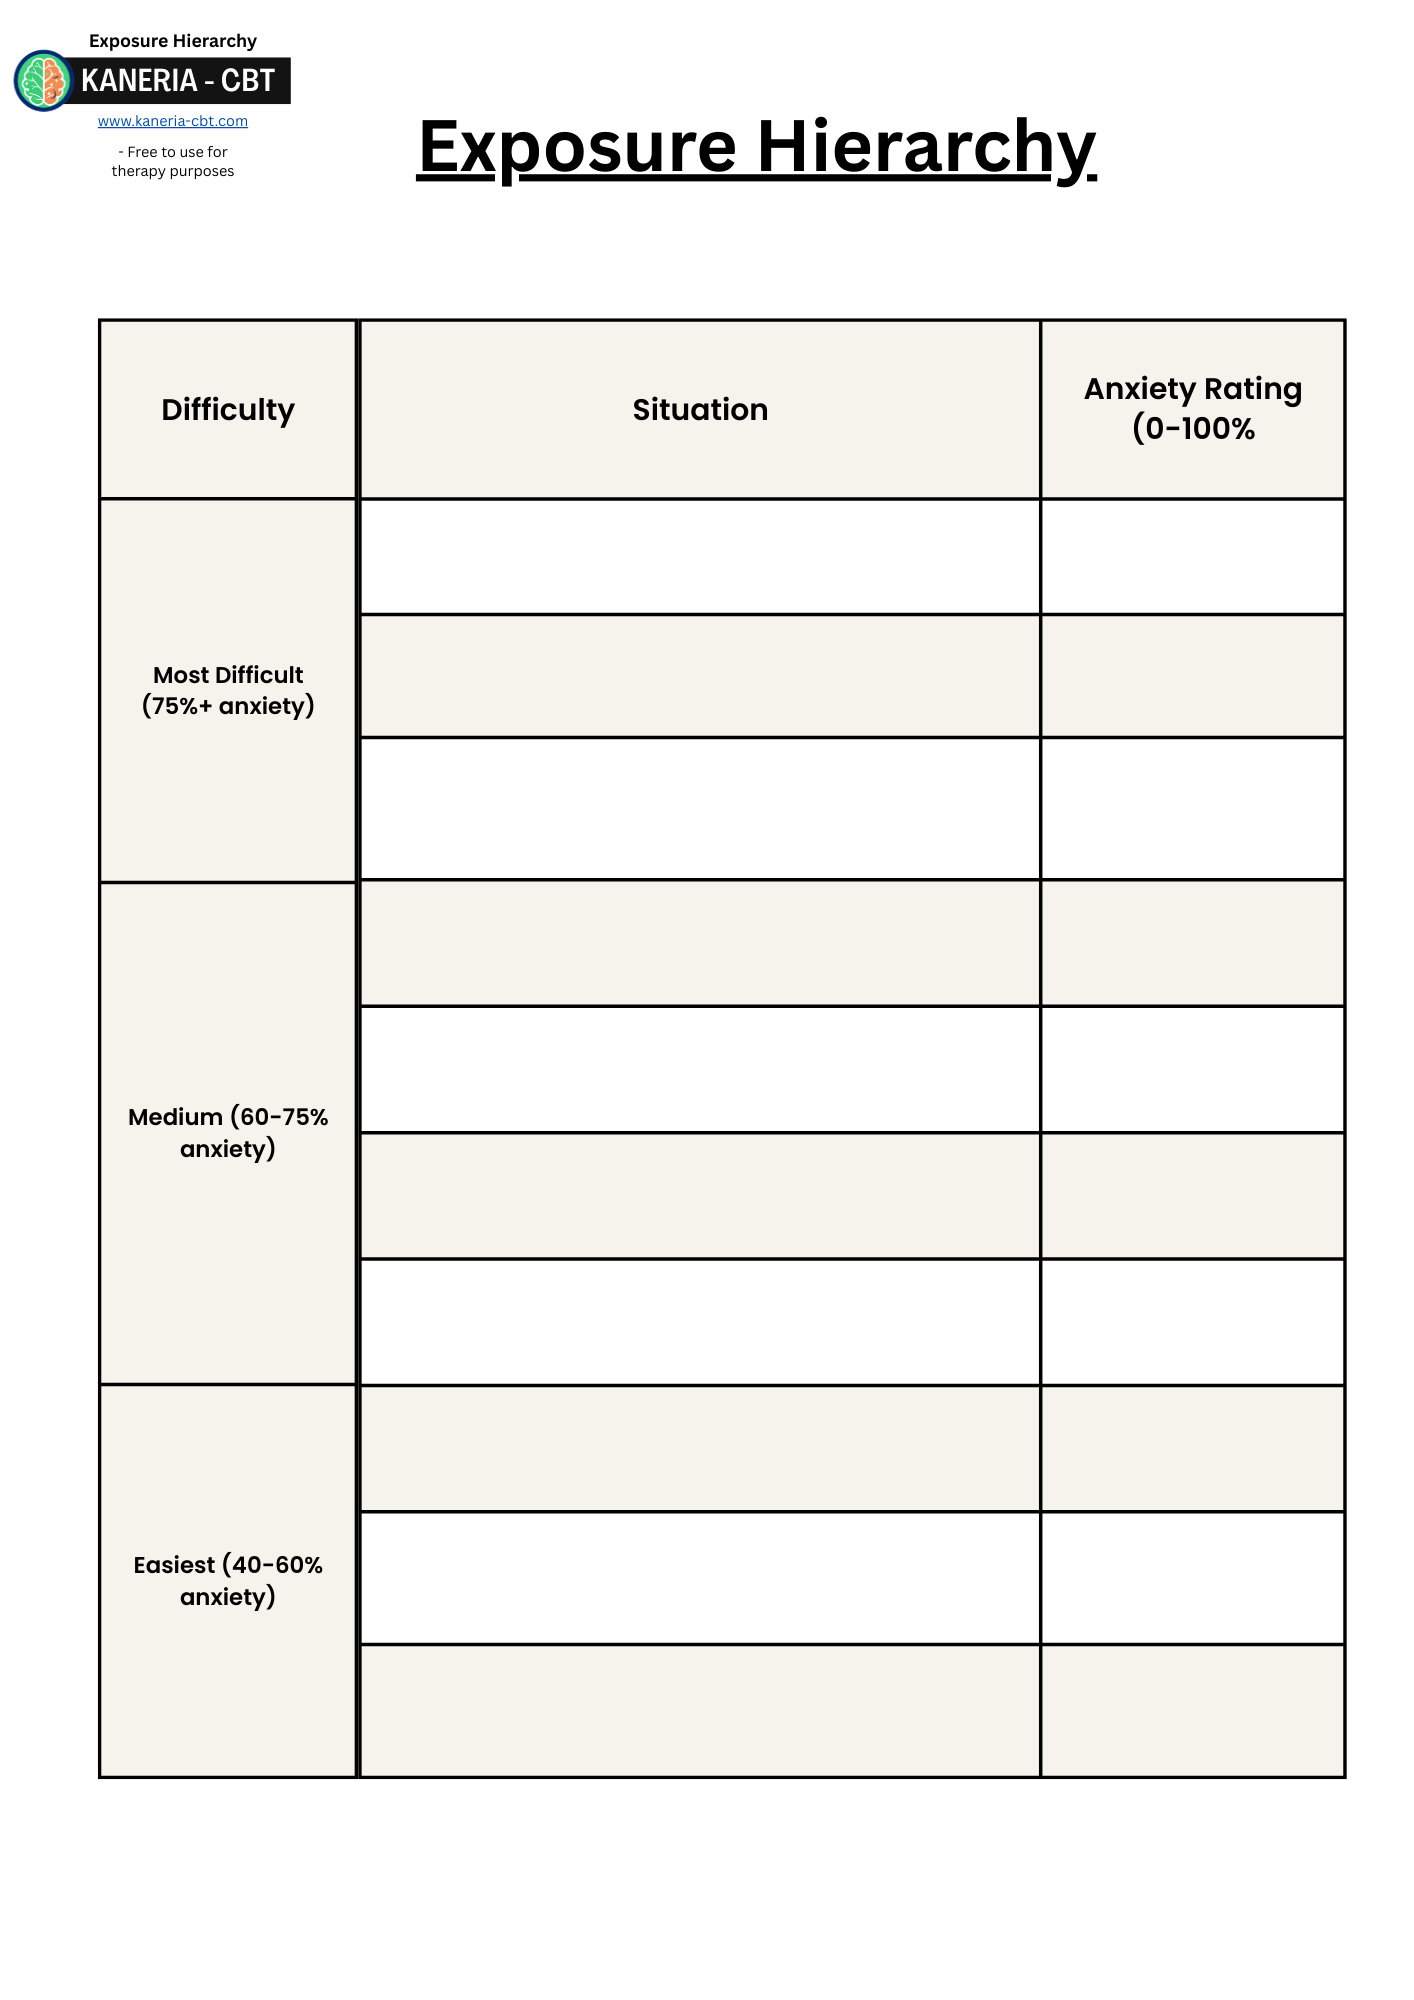
Exposure Hierarchy:
Exposure Plan:

Exposure and Habituation:
Exposure and Habituation is the treatment used for Specific Phobias and Agoraphobia. For both of these conditions the patient is actively avoiding certain situations that trigger their anxiety. This act of avoidance maintains the fear of the object or situation. Exposure therapy is a way to help patients face their fears in a graded fashion to reduce their anxiety and realise their feared outcome rarely happens.
The Main Steps of Exposure and Habituation consist of:
Step 1: Psychoeducation:
The idea of exposure can sound scary to patients. Try to imagine something you are scared of, now imagine if a therapist was about to ask you to go and face it multiple times. This is why effective psychoeducation and the rationale for exposure needs to be given. There is a lot more psychoeducation in this intervention compared to the others.
Psychoeducation should consist of:
The ABC cycle or five areas model and getting the patient to fit themselves into their own cycle.
Information on the role of avoidance/escaping in maintaining the problem.
The role of the fight and flight response in a phobia.
How exposure therapy works and what is habituation.
The 4 conditions of exposure.
ABC Cycle or five areas model:
Always start with an ABC cycle or five areas model as usual. These cycles for a phobia often involves the patient experiencing a fearful reaction to their phobia. This can include both the emotional and physical response which leads to the act of avoidance. The patient is likely to have cognitions related to the feared object (how bad, dangerous or gross it is) and a rationale to way escape or avoidance is needed.
Information on the role of avoidance/escaping in maintaining the problem.
A major psychoeducation point is how fear and anxiety are maintained by the act of avoiding a feared situation. It is best to use visual aids for this point. Most self-help materials should have a graph for this.
When faced with what is making the patient anxious, the patients anxiety will increase very quickly. This can be linked to the affect/autonomic part of the ABC cycle. Most patients will attempt to avoid or escape (or use safety behaviours) the situation (the behaviour part of the ABC cycle). This rapidly reduces the patient's anxiety level and provides a sense of relief.
This can be demonstrated with a graph that indicates that anxiety quickly spikes but reduces rapidly when escaping a situation.
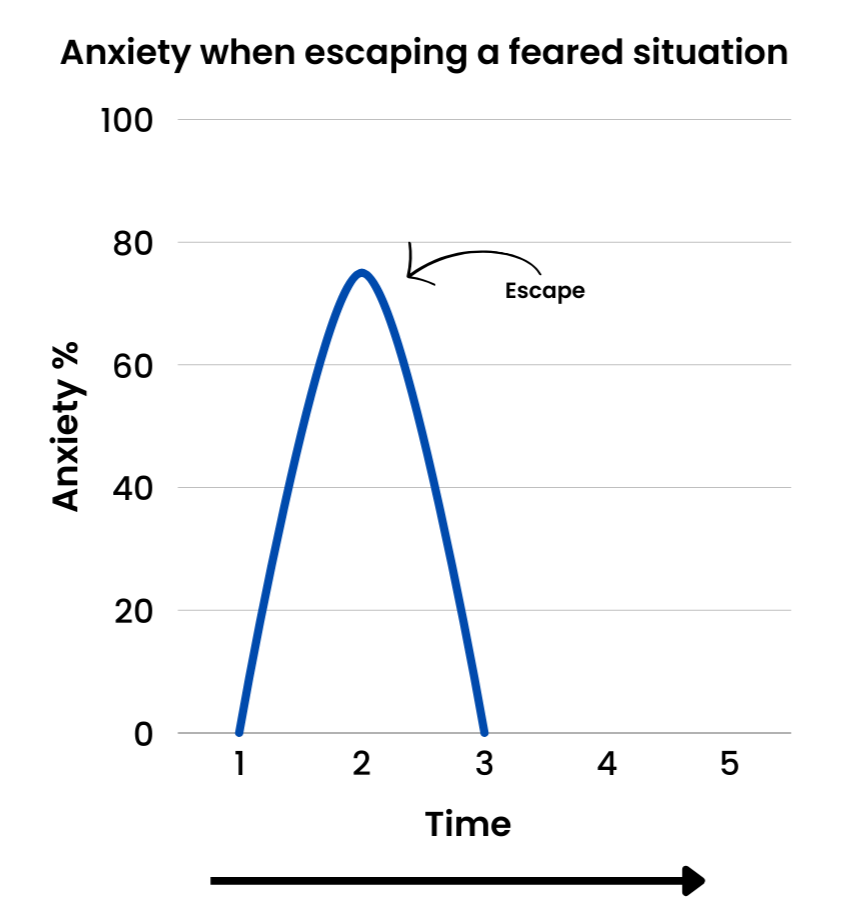
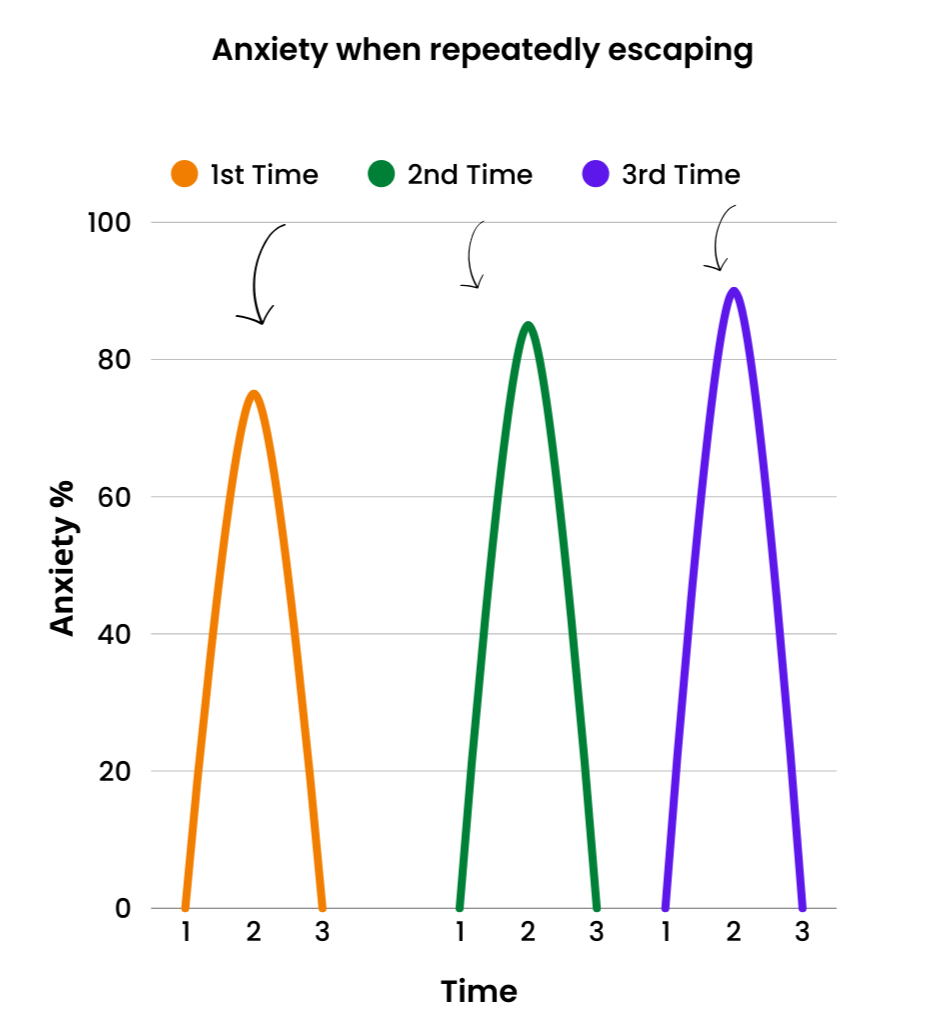
This maintains the anxiety by teaching your body and brain the incorrect lesson that the feared object/situation was in fact dangerous, and escape was needed (as this is what reduced the anxiety).
Therefore, next time the patient goes into that same situation the exact pattern repeats. The body and brain will be encouraging the patient to leave because it believes there is a life threatening danger present.
Typically, the patient's anxiety and fear about their phobia can actually worsen due to this avoidance as seen in this graph.
The brain instead needs to learn that there is no threatening danger present and that, in fact, the anxiety will come down if the patient stays in the situation.
However, patients are often unaware of this. Ask the patient what they think would happen to their anxiety if they stayed in that situation?
They may say something along the lines of:
The anxiety would go on forever.
I wouldn't cope.
I wouldn't be able to handle doing that.
I will have a panic attack the whole time.
These thoughts are not accurate, which leads on to the next psychoeducation point - that anxiety does not last forever.
Anxiety does not last forever:
Inform the patient about the role of adrenaline in anxiety and the fight or flight response.
The Fight or Flight Response is an automatic physiological reaction to an event that is perceived as stressful, frightening or life threatening. The perception of threat activates the sympathetic nervous system and triggers an acute stress response and release of adrenaline that prepares the body to fight or flee this “life threatening” danger. The important thing here is to discuss with the patient that this can be activated to the perceived or imagined threat, not only real threats.
Adrenaline (or Epinephrine for our American cousins) is a hormone that is designed to get our body ready for a life threatening danger. This sparks your anxiety instantly and is designed as a life-saving mechanism to drive you to action. The Fight or Flight Response doesn't like taking chances. Hence why patients feel the intense need to escape. Their body is reacting as if there was a real threat when there is none. An important thing to get patients to understand is that the effect of adrenaline is temporary. It is released in a small shot and once this runs out (after about 15-20 minutes) the intense anxiety response can no longer last (as it is fuelled by adrenalin). Therefore, if the patient were to stay in a scary situation, their adrenaline will run out and their anxiety will start to reduce: their breathing will return to normal, their heart rate will return to normal etc.
The advantage of staying in the situation is that it teaches their brain that the Fight or Flight Response was not needed. Nothing life threatening was present. Therefore, in the next situation, it is less likely to overreact or perceive a serious threat.
Based on this information the patient should understand that anxiety reduces over time. To help illustrate this point most self-help guides will have a graph similar this that shows that anxiety quickly spikes but reduces slowly when staying in the situation. Each repeated attempt causes the peak anxiety to reduce.
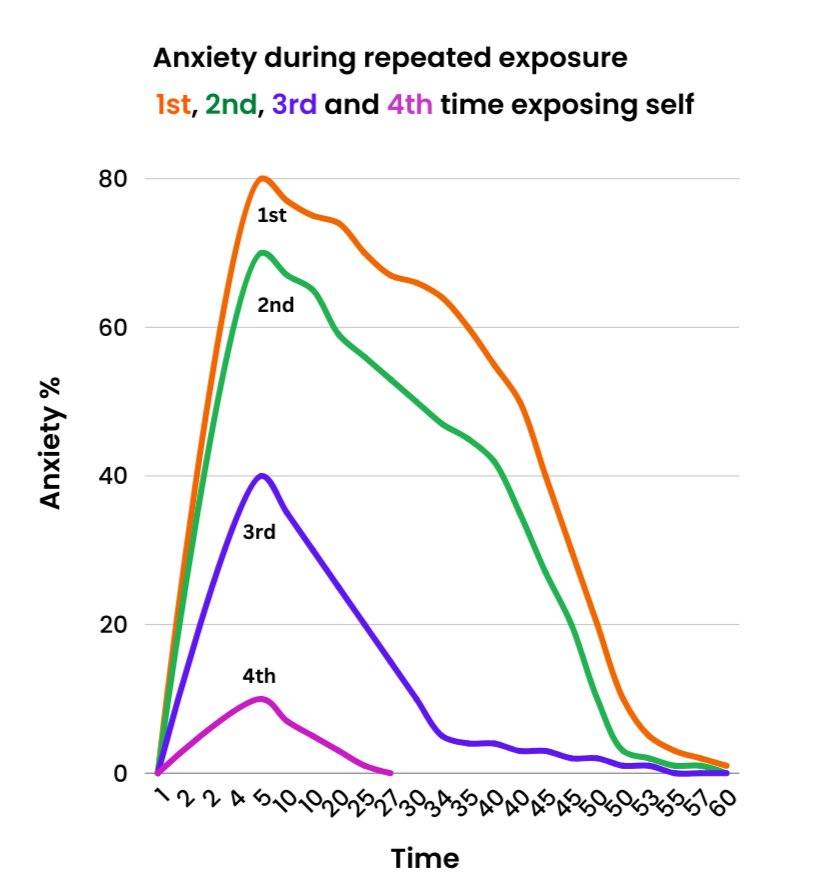
The first time the patient tries to expose themselves to their feared object, their anxiety spikes as usual but as the person remains in the situation, it starts to taper off over the hour. Each following exposure creates less anxiety until little or no anxiety is produced when in the feared situation. This reduction in anxiety over time is called Habituation. Habituation is when the brain gets used to a situation and no longer perceives it as dangerous. When the patient stops experiencing anxiety in their feared situation, then the patient has been fully habituated to the object/situation. An example of this in action is imagining watching a scary film on repeat. After a few viewings you will not be scared any more.
Some patients may respond by saying that they occasionally go to the places or have to be exposed to the things that they are afraid of, but they are still afraid. This is because just simply exposing yourself on its own does not create this habituation effect. There are four conditions which need to be met. And it is guaranteed the patient is missing at least one of them, if they are still afraid.
The four conditions:
The next important psychoeducation point is the four conditions needed to make exposure successful.
Condition 1: Graded.
Condition 2: Prolonged.
Condition 3: Repeated.
Condition 4: Without Distraction or Safety Behaviours.
As long as these conditions are met the patient will most likely habituate to their feared object.
Condition 1: Graded:
The patient needs to do exposure slowly. If they expose themselves to the thing they are most scared of first, they often back out as it is too tough. This is called flooding and is seen as unethical. Flooding is often only tolerated with the use of safety behaviours, so typically does not work (see condition 4). Therefore, it is better to create a hierarchy of tasks building up to the harder ones.
Condition 2: Prolonged:
The patient needs to expose themselves for a prolonged time. If they avoid or leave the situation too early, then they are just repeating their actions from the first graph where they were escaping (just on a slightly longer time frame).
The patient's anxiety needs to have dropped to about half of what it was at the peak/start of this exposure trial (although as previously mentioned, more recent evidence indicates that the anxiety reduction should only be used as an indication that the patient has learnt something about their feared object or ability to cope). Only the patient can truly know when their anxiety has fallen by the right amount.
Scared people are looking for any excuse to leave their feared situation. Reinforce how important it is to finish this step. Or they will have just exposed themselves and increased their anxiety for no gain. That extra 5 minutes they avoided can make the difference between habituation succeeding or failing. I often tell them to stay until they are bored.
Condition 3: Repeated:
Habituation needs to occur multiple times. Look at the second graph. Once was not enough.
The patient will need around 4-5 exposure trials for each step of their hierarchy.
This also needs to be within a short timeframe. Aim for 4-5 times in the space of a week. If a patient exposed themselves once a month for example, no habituation will occur.
Condition 4: Without Distraction or Safety Behaviours:
Exposure needs to be done without any distractions. Imagine a patient who fears flying; the whole flight their eyes were closed and they were imagining they were on a bus. They will not habituate because in their mind they were not even in a plane.
This extends to anything that distracts you. Externally (your thoughts) or internally (any actions or external stimuli), including anxiety reducing medication.
Safety Behaviours (also known as safety seeking behaviours):
A safety behaviour is anything that a patient does to help reduce their anxiety or prevent their feared outcome from occurring. This helps with short term fear reduction, but causes the fear to remain in the long term. If the patient ever had to do a task without their safety behaviour, their anxiety and fear would spike higher.
Safety Behaviours stop an individual from directly testing their fears. They don't get to see how the situation would have been without them. This impacts the patient's learning and hinders habituation.
Patients can start to believe that the safety behaviour stopped their fear from coming true when it had no effect (E.g. “I didn't have a panic attack because I took my calm’s tablet”). Additionally, safety behaviours can become a “self-fulfilling prophecy” and lead to the negative consequences they were meant to solve (E.g. a person who usually only goes out with a friend to keep them calm, having a panic attack when forced to go out alone as they are now more anxious).
Anything can become a safety behaviour. But they usually follow a similar pattern:
Behavioural strategies to verify, prevent or escape the feared outcome:
Avoidance.
Over preparing or planning every detail.
Only going when something indicates it is “safe”.
Reassurance seeking prior to the situation.
Preparing to take an item with them (E.g. Carrying around anti-anxiety medication just in case the worst was to occur).
Escaping/leaving the situation.
Possessing a safety item during the task (E.g. lucky charm or certain clothing).
Doing a safety action (E.g. taking a sip of water when anxious or listening to music).
Reassurance seeking during the task.
Taking a trusted person with them.
Reducing their senses to the situation (e.g music/distraction).
Cognitive strategies to verify, prevent, avoid or escape the feared situation:
Over preparing in mind (i.e. a plan if the worst happens, scanning for exits etc).
Telling themselves over and over it's going to be okay.
Distraction in mind (i.e Over focusing on an object or idea).
Trying to not think about the scary object.
Step 2: Creating a hierarchy of feared situations.
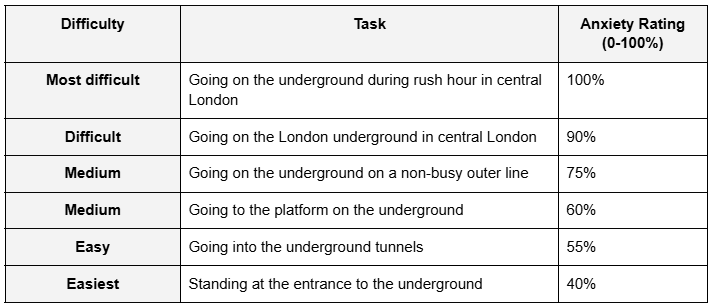
The next step in treatment after psychoeducation is for the patient to create a hierarchy of feared situations. This is to fulfil the graded condition of exposure. A hierarchy is a list of feared situations from the most feared situation at the top, with each task below it being less and less fearful. The patient rates how much anxiety from 0-100% they believe each task will cause. Ensure the anxiety rating is at least 40% or higher. Anything less than 40% does not warrant exposure.
Here is an example of a filled out exposure hierarchy: The patient will aim to start with exposure from the easiest tasks and work their way up to the top once they feel they are no longer that anxious.
Step 3: Planning Exposure Tasks.
Once the patient has done their hierarchy it is now time to plan the first exposure task.
It is best to have a detailed and concrete plan on the task they will do. As previously mentioned, exposure can be scary. A well-crafted plan can provide the motivation to proceed. Aim for the patient to create their own tasks but guide them to ensure they considered the 4 conditions.
A quick reminder:
Condition 1: Graded: The patient should choose something that causes approximately at least 40-50% anxiety to start with and work their way up.
Condition 2: Prolonged: Ask them if they remember how long they need to do it for. Until the anxiety is reduced by half (or they have learnt their fear doesn't happen, or that they can cope).
Condition 3: Repeated: Ask them how many times and when they are going to do the task. Explore any barriers to achieving this (E.g. time, access, motivation).
Condition 4: Without Distraction or safety behaviours. Go into detail about anything that could distract the patient.
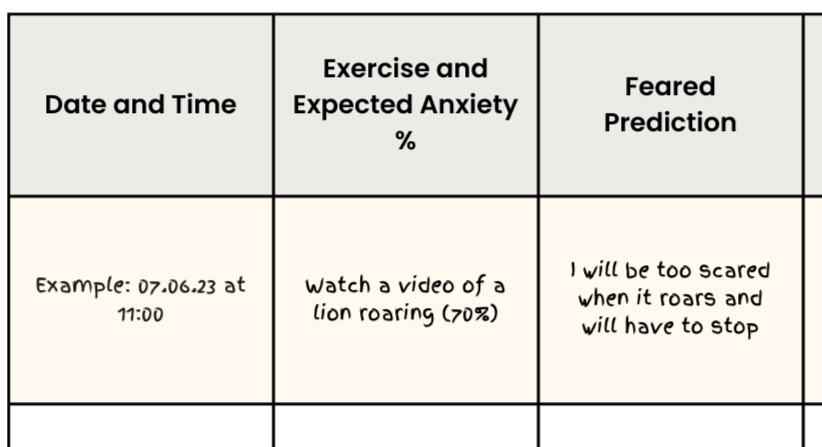
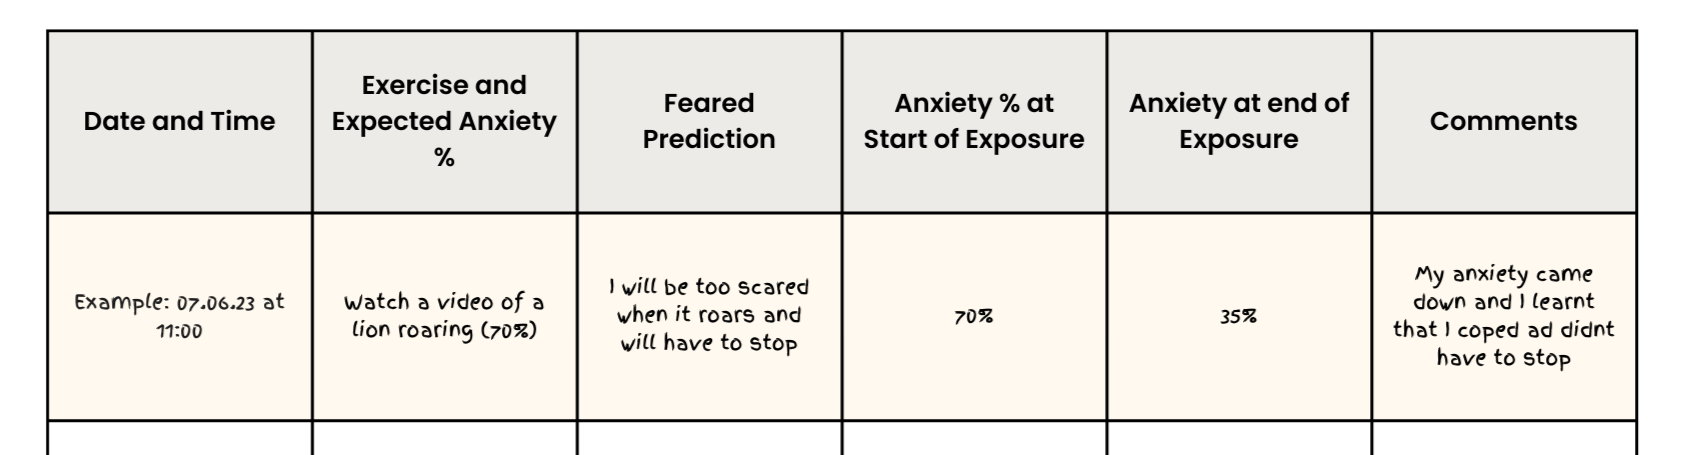
The patient should plan their exposure on a chart. Exposure diaries vary but will usually capture:
Date of time.
A section to plan the task.
The predicted anxiety 0-100% before the task started.
Some charts may have a section for the predicted feared outcome.
Looking something like this:
Step 4: Doing the exposure tasks.
Once the task is planned, it is up to the patient to actually follow through with their exposure tasks as homework inbetween sessions.
They should record their progress in a diary. Following each exposure they should record:
The duration the task lasted.
Self-reported anxiety 0-100% at the end of the task.
A section for the patient to comment and reflect on any learning from the task. As previously mentioned, patients need to learn that their feared situation is not dangerous, and that they can cope with both the situation and their anxiety.
Step 5: Review and plan the next task.
Once the patient has done their exposure task enough times that their anxiety has fallen by around half, they can plan their next exposure task from the hierarchy.
Depending on the length of the hierarchy, it is not uncommon for a patient to have not reached the top of their hierarchy before treatment ends. Therefore, it is so important for the patient to have all the skills, knowledge and ability to continue to plan and carry out their exposure tasks without therapist input.
The patient can start to reflect on their experiences of what is working and not working when exposing themselves. This is important to update their knowledge of their feared situation e.g. If they have been exposing themselves to dogs and the original fear was that “all dogs are dangerous”. Do they still believe this?
Written by David Kaneria

CBT Therapist & Previous Psychological Wellbeing Practitioner (PWP)
Author of Low-Intensity Cognitive Behaviour Therapy; A Psychological Wellbeing Practitioner (PWP) Handbook
Low-Intensity Textbook:
For more information on Exposure and Habituation and much more, check out my PWP textbook on amazon.
Exposure self help book for patients:
If any patients could benefit from any further support after therapy to maintain their progress my self-help book contains all the information a patient needs for self directed exposure all in one easy to understand book.